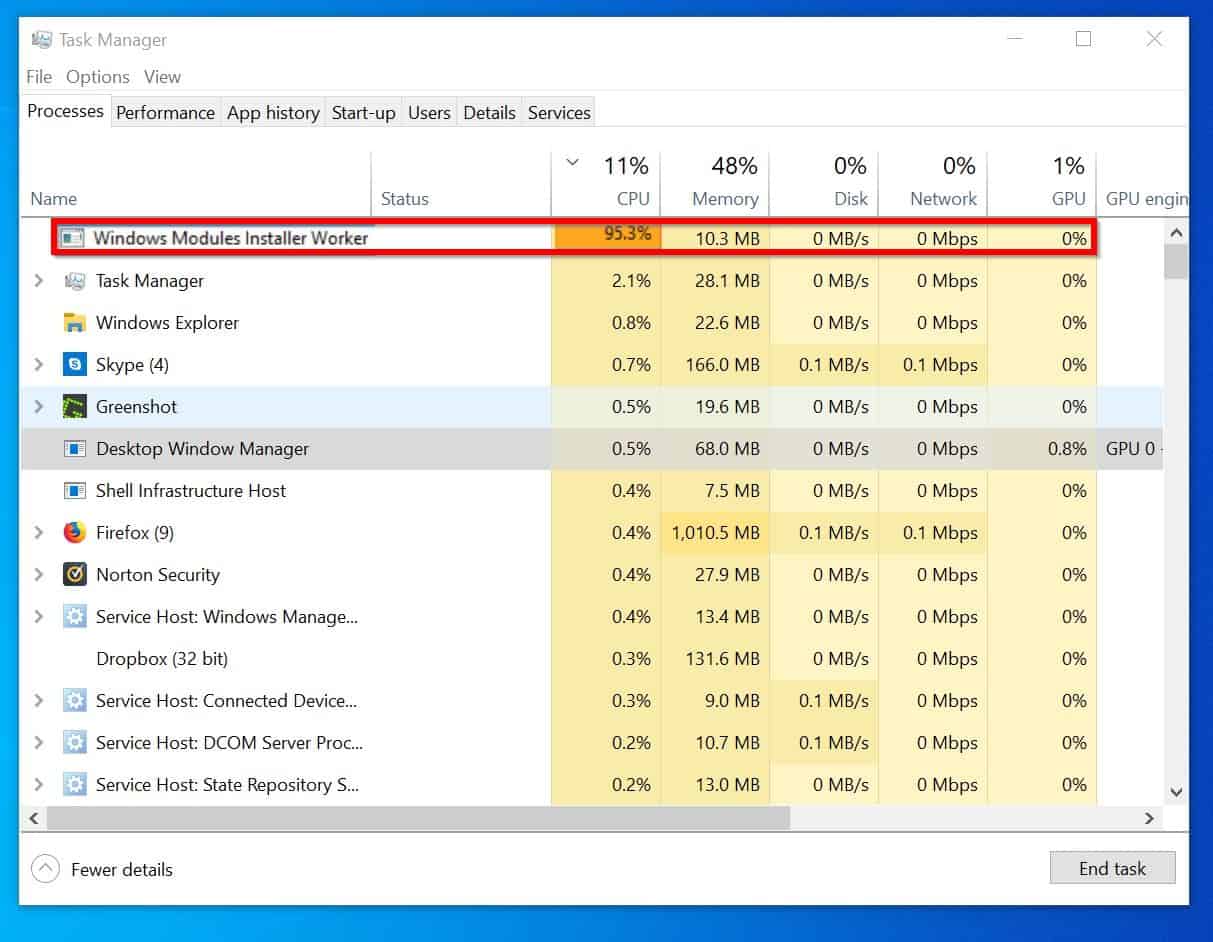
Even If you are a regular PC user and may get the experience, the PC fans suddenly spin up and run very fast. In addition, the device sometimes gets hotter for no reason. However, if you notice something like that, you need to check the task manager. After that, you will see that the “Windows Module Installer Worker” is taking a vast CPU as well as disk resources.
However, it is responsible for updating your windows system and some other components. So, if you want to disable it, you may miss the updates. Besides, it will lower the speed and work planning of your device.
By the way, here we are going to discuss the full details on the windows module installer worker. For example, we will tell you whether it is good or not, how to fix it, and some other FAQ you may have.
So, you can expect to learn a step by step guide on this topic here. Let’s jump into the issue without any further delay.
Table of Contents
What Is A Windows Module Installer Worker?
Module installer worker is responsible for some updating and installing matter in your windows ten system. It works for installation, verification, and deleting windows updates. It is continuously running in the background to see if any update is approaching or not.
Usually, Microsoft launches its updates on the second Tuesday of every month. However, they might establish the update on any other days too. By the way, during the process, it loads a lot of CPU usage. So, you might need to restart your computer to install it properly.
In addition, it will only serve you if you already permit the windows module installer worker to begin updating your PC whenever a new update has been identified. So, the primary responsibility is to check the latest updates and then install them on your systems. Besides, the service is running in the background as the PC is looking for updates and installation.
However, you will see that your device is behaving unresponsive often at the time of the update. However, it has made your device slow as well as unresponsive.
Therefore, whenever the device enables the automatic updating system, the module installer worker starts to detect the new update. However, the file behind the module installer is TiWorker.exe. And you can see it in the details tab.
Is the Windows Module Installer Worker Safe?
Many of us have a common question: is the Windows module installer worker virus? I can assure you that it is not a virus at all. In addition, the module installer is safe and sound to keep on your Windows 10 device.
Besides, as we know that it is an integral part of windows, we can rest assured to be safe. Also, as we know that it is not a virus, even not malware, so you should not delete it too. Therefore, we can leave it alone in the system unless it is not a reason for high CPU usage.
Moreover, we will not disable and even delete the module installer worker.
Why Is It Using So Much Cpu?
We can say one thing that you do not need to worry too much. As we know, basically, windows module installer workers often possess high CPU consumption.
However, there is good news too for you. And the good news is that you can manually run it. After the processing is finished, it will stop working on CPU and disk resources. After the processing, you will not see the installer and vanish from the task manager options.
By the way, you may ask how much time it will take to run. The answer depends on the speed of your system and computer’s CPU. in addition, the storage and the number of updates can also affect the installation rate.
Can We Disable The Windows Module Installer Worker?
Although you are free to disable the module installer worker, tech experts recommend not to disable it. Because it may slow the speed of your device often, but the process has some advantages too. So, we can say that you have the power to deactivate the function.
However, the deactivation will stop updating new security improvements.
By the way, some other experts may suggest setting your network connectivity to the “metered.” Because it will also stop updating your windows automatically, therefore, your device will be in danger and unable to detect critical security threats as it could not update its security. So, often it can lead to dangerous results for you.
We should also keep our trust in the windows system and policy because they want to leave the TiWorker.exe in its work and update them automatically.
How Can We Fix Windows Module Installer Worker For High Cpu Usage Errors?
However, if you decided to fix this matter of high CPU usage, we presented some solutions. So, you can choose whichever method you wish to apply. In addition, we have written it in a simple step by step way. Therefore, you will need to follow the guidelines line by line. Let’s get to the point.
Update Your Windows Manually Instead Of Automatic
You may already learn that sometimes module installer workers show errors in the time of automatic updates. Although it is a pervasive issue for windows 10 users, Windows 8/7 users may also face the same problem.
By the way, we are going to tell you the most effortless solution for this issue. So, the answer is that you need to turn the manual updates on. It does mean that the update will not take place automatically in the background.
After that, you may face problems like WMIW being unresponsive and using a maximum of your CPU resources.
Step By Step Guide To Change Automatic To Manual
Follow every step I am showing below to change the module installer worker automatic to manual.
First of all, you might require to launch the Run box by pressing the Windows key and R together.
Secondly, input service.msc in the Run box and hit the OK button.
Thirdly, you will see a new window, and from it, you need to find out the windows module installer. You can press W to locate the W serial within a short time.
Now click double on the Windows module installer from the W serial you got.
A new window will show, and you will look at the Startup Type and then tap on the run-down menu for changing automatic to manual update.
After that, press the OK button to proceed.
Now you will go back to the service.msc interface and find the windows update.
Here exchange the function in manual too.
In this step, you will go to the Control Panel, find out the Windows Update, and press on it.
After clicking the windows update, you will go to the change settings to change how the windows update will reverse itself.
You need to choose the option that checks for updates but informs me whether to download or install them. And then hit the OK button.
Finally, shut all the windows you opened and restart your device.
I hope you will never face the windows module installer error next time.
By the way, you must check the updates manually from time to time as it is vital. Because without critical updates, your computer may be unstable and face low performance.
By Changing Internet Settings
There is another way to prevent your system from updating the Windows system automatically. You can change the internet settings to disable automatic functions. By the way, there are two methods available to change the internet settings.
Method 1: Wi-Fi Network Settings.
You should follow the steps below to change the settings.
First of all, click the Start button. Secondly, go to the settings and then Network & Internet. And finally, Wi-Fi and Advanced options.
Now press on the set as a metered connection.
This setup will prevent it from automatically updating.
Method 2: Setting Up Ethernet Network.
You can also change the ethernet network to get rid of this issue. Here is how we can do it by following these step by step guides.
First of all, tap on the Windows key and the R together from your keyboard to launch the Run box.
Secondly, you need to input regedit into the box and hit the OK button.
Thirdly, you should tap Yes when it pops up.
After that, a new window will open. There you need to open HKEY_LOCAL_MACHINE and then choose Software. After that, follow these paths such as Microsoft, Windows NT, CurrentVersion, NetworkList, and DefaultMediaCost.
Now you should click the right button on DefaultMediaCost. And then select Permissions.
Tap the Add button, and here write the user name in the box.
Press on Check name and hit the OK button.
Now you need to select a new username and tick the box below and allow full control.
After that, press the OK and all the windows.
Finally, you need to restart your device to see the effect. By the way, these steps will be successful. If not, you can try the next guides.
By Fixing Tiworker.Exe
You are reading this method. I guess your problem is not solved yet. So, if you still see the WMI error on your screen after changing the windows update automatic to manual, this guide is for you.
So, here I will show you how you will fix the TiWorker.exe. It is an executable file used to update Windows. Therefore, whenever you face high CPU usage in your device, you can repair this executable file to fix the issue. However, it has a significant effect on improving the problem. By the way, let’s try to solve the issue below by following the step by step guide.
- First of all, you need to write Troubleshooting in the windows search box. After that, press on the right option. However, if someone is in the older version of windows, they need to go to the Control Panel first and then search Troubleshooting.
- Secondly, you will see new windows pop up. So, here you need to find the View All option from the left-side. After that, press on it to move into the next process.
- Thirdly, you will see another window. Here you will find out about System Maintenance. Press on it after getting it.
- Finally, you need to wait a few seconds for the procedure.
When you finish every step, restart your device. However, I believe this method should work for you. If it is not, you should try the last way I am going to write below.
Execute a Clean Boot
I consider this method the last one as far as I know. We call it a clean boot, and we will do it by utilizing the Microsoft Configuration tools. You will find this tool in the windows system easily.
However, a clean boot tool will assist you in locating both the temporary and unwanted files. In addition, you will be able to make some space by removing unwanted files.
By the way, you need to follow the steps below.
- First of all, launch the windows search box and write msconfig.exe and click the Enter button.
- Secondly, a new window will pop up. After that, choose Normal startup and then press the OK button.
- Finally, reboot your computer to see the changes.
Hopefully, this method will work on your device. And you will not face any Windows Modules Installer Worker error again.
Conclusion
We discussed the most effective methods to avoid the issue of windows module installer workers. By the way, you should always remember that the module installer worker is helpful for your device because the module helps to maintain your information and operating system safely and securely.
In addition, it saves you from virus and malware attacks by running in the background. So, you should disable it only when it is necessary and must.